File Preparation
Printing
- Case Binding Types
- Rounded and Backed Case Binding
- Casebound Cover Materials
- Cloth and Faux Leather Covers
- Cover Finishes
- Dust Jackets
- Embossing vs. Debossing
- Endsheets
- Foil Stamping
- French Folds
- Paper Coatings
- Paper Weights
- Printing Types
- Saddle Stitching
- Smyth Sewing
- Softcover Books
- Specialty Paper Options
What is a Bleed?
How to Set up Bleeds
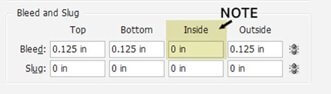
The illustration below shows InDesign bleed settings. Unlike most software, InDesign allows you to set up a proper interior text page bleed relatively easily.
- In Document Setup set your document size to the final trim size of the book, then move down to the Bleed and Slug section and setup your bleeds like the illustration below. The top, bottom and outside bleeds should be set to .125” (1/8 inch), and the inside (gutter) should be set to 0.
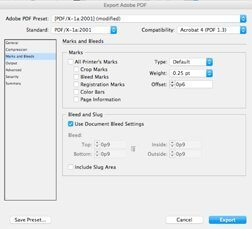
2. When you are ready to make a PDF, select Adobe PDF preset PDF/X-1a:2001. This setting will convert any RGB images/colors to CMYK and embed all fonts.
3. Under Export Adobe PDF options select Marks and Bleeds on the side menu. Make sure “Use Document Bleed Settings” is selected under Bleed and Slug. Compare your Marks and Bleeds Page to the preview shown here. Make sure no Marks boxes are selected.
Bleeds with Microsoft Word or Other Word Processing Programs
Word processing programs (such as Word) do not have bleed settings. To allow for the bleeds, you will need to add .25 inches to your width and to your height. This will allow for .125 bleed area on all sides. (Example, if you would like a 6×9 book, you will need to make your document 6.25×9.25).
Set Document Size: (add .25 to your height, and .25 to your width)
Submitted PDF Size to Final Trim Size Examples:
- 5×8.5 = 5.25×8.75
- 6×9 = 6.25×9.25
- 6.625×10.25 = 6.875×10.5
- 8×10 = 8.25×10.25
- 8.5×11 = 8.75×11.25

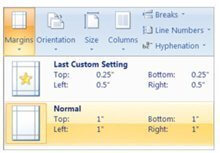
- When you change your page size to include the bleed area your margins will also need to be changed to accommodate the bleed. So, if you had .5” margins top, bottom and outside edge, you would need to change them to at least .625”, though 1” might be better.
2. If you are ready to create a PDF and if you have Adobe software installed, click File, then Save As and select PDF in the drop-down menu.
3. After converting your Word document to PDF, check the PDF closely to ensure no unwanted changes occurred during the conversion and that your document is the correct size.
